essential tips for new drummers
1. HAND AND FOOT TECHNIQUE
Grip Holding the sticks in an efficient manner is key to getting off to a good start. An easy way to find your grip is to stand up with your hands at your side. Using your left hand, place the stick into your right hand. The flat part of your thumb should make contact with the stick and your remaining fingers then wrap around naturally. Repeat the procedure, placing the other stick into your left hand. Grip the sticks back slightly from the actual balance point (the middle) of the stick. When using matched grip, it’s common that the butt (back) of the stick makes contact near the bottom of the inside of your hand.
Fulcrum Pinch the sticks between the thumb and first joint of the index finger and/or the thumb and the second joint. Some drummers feel more comfortable using the middle finger or a combination of index and middle finger.
Tight vs. Loose Gripping the sticks too tightly keeps the tip from bouncing freely off the playing surface. Secure the stick only hard enough to ensure that it doesn’t fly out of your hand. As the late Jim Chapin advised, hold the sticks as you would a baby bird.
Angle Of Attack The American grip (where the sticks become an extension of the lower part of your arm and the thumb is in a 3/4 position) produces a playing angle of about 60–80 degrees. This makes it easy to target the inner concentric circle of the drumhead, and allows you to more easily access both wrists and fingers. The French grip (thumb on top) and German grip (thumb on the side) are also useful (the French grip, for example, works well for playing time on a ride cymbal or a floor tom), but the American grip is the preferred way to start.
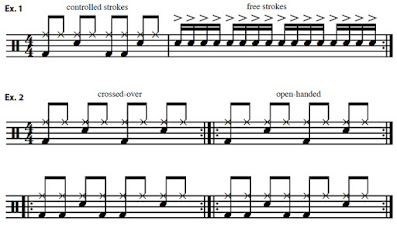
Free vs. Controlled In a free stroke, the rebound carries the stick from a high position (near shoulder height) back to a high position. In a controlled stroke, the stick starts high, strikes the drum, but is then controlled by the fingers in a low position (a few inches off the head). Ex. 1 Play controlled strokes in the first measure (a simple eighth-note rock beat) and free strokes in the second measure (the sixteenth-note fill). You may find it easier to produce free strokes using the second joint and thumb as the fulcrum while utilizing the American grip.
Matched vs. Traditional Beginners often find traditional grip more challenging to pick up than matched. The traditional fulcrum (non-dominant hand only) is located in the fleshy webbing between your thumb and pointer finger (instead of between two or three of the fingers in matched). Also, instead of the more familiar up and down motion of matched, traditional uses a completely different motion — an underhand rotation of the forearm — to produce the stroke. To avoid unnecessary cognitive dissonance, you might want to wait to learn traditional grip until you’ve become comfortable with matched.
Arm, Wrist, And Fingers At first, some beginners have a tendency to inefficiently use their arms to propel the sticks, instead of their wrists. To learn to avoid this, grab your right forearm with your left hand, thereby immobilizing your right arm. Now play using your wrist only.
Incorporating your fingers in the playing motion — along with the wrists — is another important technique. To get a feel for this, hold your right stick using the French grip. Next, grab ahold of your right wrist with your left hand. Because you can’t move your right wrist, you’ll propel the stick using only your fingers.
Crossed Over vs. Openhanded When playing rock or funk beats, most drummers cross their dominant stick over to the hi-hat while crossing their non-dominant hand to the snare (normally right over left). The logic here is that the strong hand can better handle the speed and endurance required in hi-hat playing. In open-handed playing (non-crossed-over), the wrists/ arms operate within a full range of motion. Ex. 2 As a beginner, you’ll benefit greatly by learning to both cross over and play open-handed. The two-measure phrases in this exercise (one measure crossed-over, one measure open-handed) should entice you to make both techniques a permanent fixture in your practice routine.
2. LEARNING METHODS
Heel-down vs. Heel-up In heel-down technique, the entire bottom portion of the foot remains on the pedalboard as the lower leg and ankle push down. This technique allows for the beater to bounce easily off the head, producing a more resonant bass drum tone. In heel-up technique, your heel rises slightly off the pedalboard, while the ball of the foot remains. With heel-up, it’s easier to bury the beater (allow it to remain on the head), giving off more attack and less resonance. This technique uses the bigger muscles in your upper leg and hip and can yield extremely powerful strokes.
Using heel-down, beginners often have trouble keeping their toes from coming off the pedal; and using heel-up, they often lift their entire foot off the pedal and stomp on it. Lifting off the bass drum pedal provides no mechanical advantage and can produce long-term control issues.
Learning Methods
Vocabulary Learning the names of the parts of the drum kit and the history of each, whether teaching it to yourself or communicating with your students, is not a waste of time. In fact, it will save you hours of frustration in the long run.
one Note At A Time When faced with a daunting groove or lick, you can approach it one note or one group of notes at a time. Your brain can more easily absorb small bits of information that way.
Copy Cat This fun method requires two or more drummers (though it is possible to do this activity by yourself). The leader (often a teacher) plays a lick and the follower (the student) copies it. This can be done with or without the aid of sheet music.
Deconstruction When multilayered beats and fills are broken down into their component parts, the brain can more easily accept the vertical relationships of the notes. Ex. 5a–5g A one-measure funk pattern (5a) is broken down into its component parts: hi-hat only (5b), bass drum only (5c), and snare only (5d). Next, combinations of two components are paired together: hi-hat and bass drum (5e), hi-hat and snare (5f), and bass drum and snare (5g). When you’ve mastered each individual exercise, go back to the top and try the original pattern. Did this method help you?
Slow It Down Slowing down a pattern allows your body to relax and gives your brain time to process the information. If you go slowly enough, a potential mistake instead becomes a graceful recovery. A metronome is a great tool. It ensures that you start as slowly as you think you should, and can help tug you along to an ideal tempo.
Play Softer There’s nothing quite as exhilarating as pounding away on the drums. However, it can be counterproductive when you’re trying to learn something new. Loud noises can cause lapses in concentration. Once you have the pattern down pat, turn it back up to ten.
3. TIME AND GROOVE
Songs Let’s face it; drumming is mostly used for accompaniment. Our job is to help convey the message and support the song. Though there are many great play-alongs available, drumming to music that includes both vocal melody and lyrics is invaluable.

Σχόλια
Δημοσίευση σχολίου